
How to Mount Gear on MOLLE Panels: Step-by-Step Guide
Table of Contents
- What You'll Need Before You Start Mounting Gear
- Understanding the PALS System and Your MOLLE Panels
- How to Weave MOLLE Straps: Step-by-Step
- Securing Pouches and Gear to Your Panel
- 3D Printed MOLLE Mounts for Custom Gear
- Automotive MOLLE Panel Organization Done Right
- Common Mounting Mistakes and Troubleshooting Loose Attachments
- Conclusion
- Frequently Asked Questions
Last Updated: September 25, 2026
What You'll Need Before You Start Mounting Gear
Mounting gear on MOLLE panels starts with the right parts and a few minutes of prep. MOLLE (Modular Lightweight Load-carrying Equipment) is a load-bearing system built around rows of heavy-duty nylon webbing. The panels give you a grid of attachment points so you can build a custom loadout for your truck, workshop, RV, or boat.
Gather these items before you begin:
- Your rigid panel or fabric webbing panel
- Attachment straps or clips that match your gear
- A flathead screwdriver or webbing tool
- A tape measure
- Your pouches, tools, or mounts
- A clean, flat work surface
Understanding the PALS System and Your MOLLE Panels
PALS, or Pouch Attachment Ladder System, is the webbing grid that makes MOLLE gear modular. Each row of horizontal webbing sits about 2.5 centimeters apart, and the vertical stitches create channels for straps to pass through. That spacing is standard, so a pouch or strap that works on one panel usually works on all of them.
PALS Webbing vs. MOLLE: What's the Difference?
PALS is the attachment grid. MOLLE is the overall gear system that uses that grid. People use the terms interchangeably, and in practice that's fine. When you shop for straps or pouches, look for PALS-compatible webbing and you'll be covered either way.
Rigid Panels vs. Fabric Webbing
Rigid panels hold their shape and handle heavy loads without sagging. Fabric webbing panels are lighter and cheaper, but they flex under weight, and a panel that flexes will work straps loose over time. For vehicle use, rigid panels win every time.
How to Weave MOLLE Straps: Step-by-Step
Weaving is the core skill, and it takes about a minute per strap once you get the rhythm. The goal is a snug, flat strap that locks the pouch to the panel without pinching the webbing.
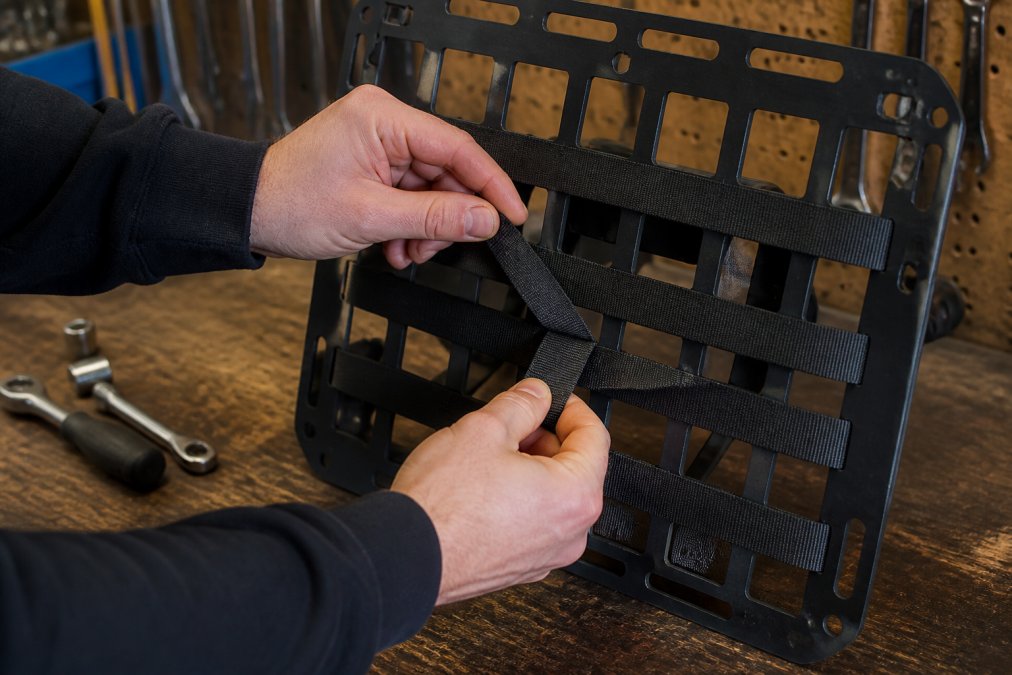
Here's the process:
- Line up your pouch so its straps sit over the panel rows.
- Push the strap tip through the first webbing row, front to back.
- Bring it back through the next row, back to front.
- Repeat the over-under pattern down the panel.
- Pull each pass snug before moving to the next.
- Fasten the end with the snap button or clip.
The Over-Under Weave Pattern
The over-under pattern is what gives the attachment its hold: each pass through the webbing creates friction against the nylon, and that friction keeps the strap from sliding. Skip a row and the strap will creep; weave every row and the pouch stays put.
Securing Pouches and Gear to Your Panel
Secure each pouch with at least two straps, spaced as far apart as the pouch allows. One strap lets the pouch pivot; two lock it in place. For heavier gear, add a third strap across the middle to spread the load and cut down on movement.
Snap Button and Fastener Tips
Snap buttons and fasteners should close with light pressure. If you have to force one, the strap is too tight or misaligned. Loosen it, re-seat the strap, and try again.
3D Printed MOLLE Mounts for Custom Gear
Standard straps work for standard pouches. Oddly shaped tools, radios, and one-off gear need something built for them, that's where 3D printed MOLLE mounts come in. At Maligator Fab, we design and print custom mounts in ASA plastic, which holds up to UV and heat far better than common print materials.
Common uses include:
- Custom brackets for hand tools and diagnostic gear
- Mounts for radios and handheld devices
- Holders for oddly shaped recovery equipment
- Pegboard and panel adapters for workshop storage
Automotive MOLLE Panel Organization Done Right
Organizing a vehicle panel is not the same as organizing a wall or a vest. A panel bolted inside a truck, van, SUV, or RV rides through constant low-amplitude vibration, repeated temperature swings, and lateral cornering forces that push gear sideways every time you turn. Plan the layout around those forces, not just around how the loadout looks.
Rigid Panels vs. Fabric Webbing in a Vehicle
Rigid panels, typically aluminum, steel, or high-density polymer, hold their shape under load and keep the PALS grid flat so straps stay tensioned. Fabric webbing panels are lighter and cheaper, but they flex, and in a vehicle every bounce lets the panel move independently of the gear, working fasteners loose over time.
Mounting the Panel Itself
How the panel attaches to the vehicle matters as much as how gear attaches to the panel. Three common approaches:
- Bolt-through to factory threaded points. Strongest option. Uses existing seat-back, bed-rail, or cargo-tie-down threads. No drilling into structural metal.
- Rivet nuts into sheet metal. Good for interior cargo walls. Requires a rivet-nut tool and a backing washer on thin panels.
- Bracket-and-clamp systems. Reversible and removable. Best for leased vehicles or setups you swap between rigs.
Quick-Detach vs. Permanent Mounting
Not every piece of gear should be woven on. Match the hardware to how often you need to remove the item:
| Gear type | Best hardware | Why |
|---|---|---|
| Daily-carry pouch | Woven straps | Lowest profile, most secure, cheapest |
| Radio, GPS, handheld | QD clip or buckle | Off the panel in seconds without re-weaving |
| Recovery tools | Woven straps + retention strap | Heavy, needs maximum hold |
| First aid kit | QD clip | Must come off one-handed in an emergency |
| Seasonal or occasional gear | QD clip | Swap loadouts without touching the panel |
Weight Management and Center of Gravity
Weight distribution decides whether your panel feels solid or rattles. Keep the heaviest items low and centered, and spread the load across the full width instead of clustering it in one corner, a top-heavy loadout swings on rough roads, working fasteners loose and stressing the panel mounts.
| Goal | Placement | Why It Works |
|---|---|---|
| Fast access | Eye level, outer edge | Reach without leaning |
| Heavy tools | Low and centered | Keeps center of gravity down |
| Light pouches | Upper rows | No strain on the panel |
| Emergency gear | Outer edge | Grab-and-go in a hurry |
| Frequently swapped gear | QD hardware, mid-panel | Easy on/off without re-weaving |
Vibration and Temperature
A vehicle interior can swing from below freezing overnight to well over 100°F in direct summer sun. Nylon webbing relaxes slightly when warm and stiffens when cold, which changes how much tension a strap holds. Check strap tension after the first few drives in a new setup, and again at the start of each season.
Common Mounting Mistakes and Troubleshooting Loose Attachments
A loose attachment is almost never a mystery. It is one of a small number of mechanical failures, and each one has a specific fix. Work through the list below in order, the first item that matches your symptom is usually the cause.
Diagnose Before You Re-Weave
Before pulling the pouch off, test it by hand:
- Push the pouch side to side. If it pivots, you have a strap-count problem.
- Lift the pouch straight up. If it slides, you have a tension problem.
- Press down on the pouch. If the panel flexes but the pouch stays put, the panel mount is the issue, not the strap.
- Shake the panel. If you hear a rattle but the pouch feels tight, the noise is coming from a fastener, not the weave.
Each result points to a different fix. Re-weaving a pouch that is actually rattling because of a loose snap button wastes an hour.
The Four Real Causes
- Skipped webbing rows. Each pass through the PALS grid creates friction against the nylon. Skip a row and you lose roughly a third of the grip on that strap. Weave every row the strap can reach.
- Single-strap mounting. One strap lets the pouch pivot around the attachment point; two straps spaced as far apart as the pouch allows lock it in place, and three for anything heavy.
- Over-tightened straps. Cranking a strap crushes the webbing channel, distorts the snap button, and reduces holding force because the strap can no longer lie flat. Snug is the target.
- Worn or stretched nylon. Nylon webbing loses elasticity with UV exposure and age. A strap that has been on a sun-baked panel for two summers will not hold tension like a new one. Replace it.
Fixing a Pouch That Still Shifts
If the pouch passes the hand tests but still moves on the road:
- Add a third strap across the middle of the pouch to spread the load and cut lateral movement.
- Move the pouch to a lower row. Lower rows sit closer to the panel's mounting points, so they flex less.
- Switch to a wider strap. A 1-inch strap holds more surface area than a 3/4-inch strap and resists creep better.
- Add a retention strap over the top of the pouch if the contents themselves are shifting inside it.
Fixing a Rattle Without Re-Weaving
A rattle is a different problem from a shift. Common sources:
- Loose snap buttons or buckles. Re-seat them or replace the hardware.
- Metal tools touching each other inside a pouch. Add a foam liner or separate the tools into individual slots.
- A pouch that is too large for its contents. The contents move inside the pouch even though the pouch is tight to the panel. Downsize the pouch or add internal padding.
- A panel that is not fully bolted down. Check the panel-to-vehicle fasteners, not the gear-to-panel straps.
Quick-Detach Setups and Loose Gear
Occupational Safety and Health Administration guidance on securing tools and equipment
Conclusion
Building a loadout that stays put takes the right weave, the right strap count, and a layout that respects weight and access. Get those three right and your gear stays where you put it.
Frequently Asked Questions
What gear can be attached to MOLLE panels?
MOLLE panels accept pouches, tool holders, first aid kits, water bottle carriers, and custom mounts. The PALS ladder system lets you attach anything with compatible straps or fasteners. For automotive use, common items include recovery gear, flashlights, and small tools. If your gear lacks MOLLE-compatible straps, 3D printed MOLLE mounts can adapt oddly-shaped items to the panel's attachment points.
How do you weave MOLLE straps correctly?
Thread the strap horizontally through one row of webbing, then vertically down through the next row, alternating over and under each horizontal strip. Keep tension firm but not so tight that the webbing deforms. The over-under pattern locks the strap in place and prevents shifting. Finish by securing the snap button or fastener. Check the fit by pressing on the pouch; it should not slide along the panel.
Can 3D-printed mounts be used on MOLLE panels?
Yes, 3D printed MOLLE mounts work well when printed in durable materials like ASA plastic, which resists UV exposure and heat. These mounts attach to the PALS webbing or bolt directly to rigid panels. They are useful for holding tools or gear that lack standard MOLLE straps. Custom designs can match specific attachment points and load requirements, though you should verify the mount's weight rating before offroad use.
How do I keep my gear from rattling on offroad trails?
Rattling usually comes from loose straps or insufficient tension. Re-weave straps with firm tension and ensure snap buttons are fully engaged. Add foam padding behind rigid items or use rubber washers at mounting hardware contact points. For heavier gear, distribute weight across multiple attachment points and check fasteners after each trail run. If rattling persists, a custom mount that fits your gear exactly will eliminate movement better than generic straps.